Friday, March 8, 2013

Create Windows


import maya.cmds as cmds;
win = cmds.window(
     'ar_optionsWindow',
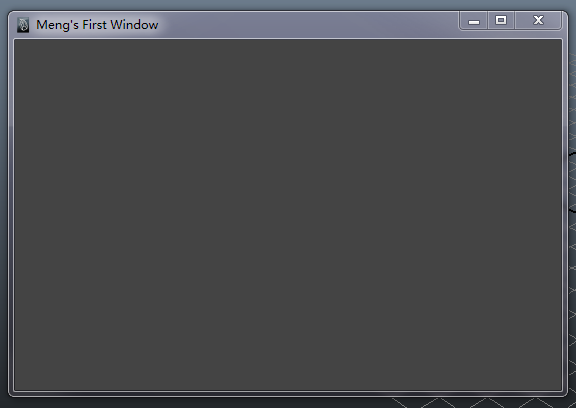
     title='Meng\'s First Window', //a title bar string,\is the escape character(转义字符)
     widthHeight=(546,350) //window's size
);
cmds.showWindow(win); //to display the window

PS: You cannot change the window's name when the window is still there. To make changes to a GUI, you must destroy it, make your change, and then show it again. You can destroy your window by pressing the close button in its corner or using the deleteUI command, like the following codes:


cmds.deleteUI(win, window=True); //delete exiting window
win = cmds.window(
    'ar_optionsWindow',
    title='Meng\'s Second Window',
    widthHeight=(546,350)
);
cmds.showWindow(win);


Thursday, March 7, 2013

Moving UVs Tool

Just a simple example to show how to create your own marking menu.
1) In the main application window, open the marking menu editor by select window -- setting/preferences -- marking menu editor.
2) In the marking menus window, click the create marking menu button.
3) In the create marking menu window, the top displays a group of icons representing the different locations in the marking menu. RMB click the icon for the east item and select edit menu item from the context menu.
4) Enter the following lines in the commands input field:
    python("import maya.cmds as cmds");
    python("cmds.polyEditUV(u=1.0, v=0.0)");
5) In the label field, enter the word "Right" and press the save and close button.
6) In the marking menus window, edit the west menu item to have the following command input. Similar to the command created in step 5, this marking menu item will move the currently selected UVs one unit to the left.

    python("import maya.cmds as cmds");
    python("cmds.polyEditUV(u=-1.0, v=0.0)");
7) In the label field, enter the word "Left" and press the save and close button.
8) Keeping the create marking menu window open, create a cube and enter UV editing mode (RMB+east)
9) Open the UV texture editor window (window -- UV texture editor). 
10) Select all the cube's UVs.

11) In the create marking menu window, use the LMB in the test area (lower left) to try out the new marking menu on the cube's UVs.

12) Give this custom marking menu a name and save it.

Tuesday, March 5, 2013

Tips when designing for users

Communication 
Identifying and communicating with your customers during your tool development process is a central task.
Observation
Observing your users, either directly or indirectly, can sometimes be more illuminating than an email or even a meeting. By observing your users directly, you can often help them uncover better solutions to a problem than they originally thought they wanted.
Ready, Set, Plan!
As you plan, remember so stay focused on the problem!
Simplify and Educate
You may frequently have to strike a balance between making a tool easy to use while also leaving it open for users to apply in corner cases or even possibly extend for special uses.

Monday, March 4, 2013

LOD Window (PyMEL)

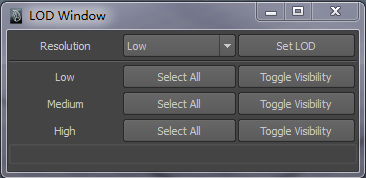
I wrote a simple PyMEL example to manage the level of detail tagging for a game using PyMEL. The basic premise is that objects can be selected and have an attribute applied to them that determines the level of detail. Once this tag has been applied, objects can be selected and shown or hidden.

1)from lodwindow import LODWindow;
  win = LODWindow();
  win.create();
2)import pymel.core as pm;
  for res in range(4)[1:]:
     for i in range(3):
        cyl = pm.polyCylinder(sa=res*6, n='barrel1');
        cyl[0].tx.set(i*cyl[1].radius.get()*2);
        cyl[0].tz.set((res-1)*cyl[1].radius.get()*2);
3)select all of the low-resolution cylinders in the back row, select the Low option from the LOD window dropdown menu, and press the Set LOD button. Repeat the same steps for the corresponding medium and high resolution cylinders.

Then, you could play around with all the buttons to your liking.

PS: here is the code in lodwindow.py

import pymel.core as pm
class LODWindow(object):
    """A pymel class for an level-of-detail editing window"""
    ## unique handle for the window
    WINDOW_NAME = 'LOD Window'
    def tag_nodes(self, node_list, res='Low'):
        """tag the supplied nodes with the supplied resolution"""
        for node in node_list:
            # add gameRes attribute if needed
            if not node.hasAttr('gameRes'):
                node.addAttr('gameRes', dataType='string')
            node.gameRes.set(res, type='string')
    def create(self):
        # destroy the window if it already exists
        try:
            pm.deleteUI(self.WINDOW_NAME, window=True)
        except: pass
        # draw the window
        with pm.window(self.WINDOW_NAME) as res_window:
            with pm.columnLayout(adjustableColumn=True):
                with pm.horizontalLayout():
                    pm.text(label='Resolution')
                    with pm.optionMenu() as self.res_menu:
                        pm.menuItem(l='Low')
                        pm.menuItem(l='Med')
                        pm.menuItem(l='Hi')
                    set_res_btn = pm.button(
                        label='Set LOD',
                        command=pm.Callback(self.on_set_res_btn)
                    )
                pm.separator(style='in', height=4)
                with pm.horizontalLayout() as h1:
                    pm.text(label='Low')
                    select_low_btn = pm.button(
                        label='Select All',
                        command=pm.Callback(
                            self.on_select_btn,
                            'Low'
                        )
                    )
                    toggle_low_btn = pm.button(
                        label='Toggle Visibility',
                        command=pm.Callback(
                            self.on_vis_btn,
                            'Low'
                        )
                    )
                with pm.horizontalLayout() as h1:
                    pm.text(label='Medium')
                    select_med_btn = pm.button(
                        label='Select All',
                        command=pm.Callback(
                            self.on_select_btn,
                            'Med'
                        )
                    )
                    toggle_med_btn = pm.button(
                        label='Toggle Visibility',
                        command=pm.Callback(
                            self.on_vis_btn,
                            'Med'
                        )
                    )
                with pm.horizontalLayout() as h1:
                    pm.text(label='High')
                    select_hi_btn = pm.button(
                        label='Select All',
                        command=pm.Callback(
                            self.on_select_btn,
                            'Hi'
                        )
                    )
                    toggle_hi_btn = pm.button(
                        label='Toggle Visibility',
                        command=pm.Callback(
                            self.on_vis_btn,
                            'Hi'
                        )
                    )
                self.status_line = pm.textField(editable=False)
            res_window.setWidthHeight((350,140))
    def on_set_res_btn(self, *args):
        """action to execute when Set LOD button is pressed"""
        # filter selection to only include meshes
        selected = [
            i for i in pm.ls(sl=True) if (
                type(i.getShape())==pm.nt.Mesh)
        ]
        res = self.res_menu.getValue()
        if selected:
            self.tag_nodes(selected, res)
            self.status_line.setText(
                'Set selection to resolution %s'%res
            )
        else:
            self.status_line.setText('No selection processed.')
    def on_select_btn(self, *args):
        """action to execute when Select All button is pressed"""
        # get all the meshes in the scene
        poly_meshes = [
            i for i in pm.ls(
                type=pm.nt.Transform
            ) if type(i.getShape())==pm.nt.Mesh
        ]
        if poly_meshes:
            # select anything with the gameRes attribute and the appropriate value
            pm.select(
                [i for i in poly_meshes if (
                    i.hasAttr('gameRes') and
                    i.gameRes.get()==args[0])
                ]
            )
            self.status_line.setText(
                'Selected %s resolution meshes'%args[0]
            )
        else:
            self.status('Nothing else selected')
    def on_vis_btn(self, *args):
        """action to execute when the Toggle Visiblity button is pressed"""
        # filter list to only include meshes
        poly_meshes = [
            i for i in pm.ls(type=pm.nt.Transform) if (
                type(i.getShape())==pm.nt.Mesh)
        ]
        if poly_meshes:
            # get everything with the current resolution
            res = [i for i in poly_meshes if (
                i.hasAttr('gameRes') and i.gameRes.get()==args[0])
            ]
            if res:
                for j in res:
                    # flip visibility
                    j.visibility.set(1-int(j.visibility.get()))

Sunday, March 3, 2013

PyMEL

1) Installing PyMEL
2) Introduction to PyMEL
PyNodes:
written more pythonically, faster than maya.cmds counterparts, tracking identities in code much simpler and more reliable than working with object names, speed up node and attribute comparisons.

Advantages:

  • Experienced Python programmers may have a much easier time learning PyMEL due to its object-oriented nature.
  • PyMEL syntax tends to be a bit cleaner and creates neater code.
  • Speed is greater in some cases due to API hybridization.
  • The pymel package is open source, meaning studios can pull their own branch and add their own features and fixes.
Disadvantages:
  • PyMEL's object-oriented nature can present a learning curve to MEL programmers. Switching from MEL to Python and learning a new programming paradigm at the same time can be daunting.
  • PyMEL is not very widely adopted yet. A small community does mean that sometimes getting questions answered is difficult. Nevertheless, the development team is always eager to answer questions online.
  • In some cases, speed can be degraded. Processing large numbers of components, for instance, can be much slower using PyMEL depending on the specific operation.
  • Autodesk's ling-term roadmap for PyMEL is unclear.
  • Because the pymel package is open source, it is possible (though rare) to get into a situation where a custom branch is quite divergent from the main one.

Saturday, March 2, 2013

INHERITANCE


In object-oriented programming (OOP), inheritance is a way to reuse code of existing objects, or to establish a subtype from an existing object, or both, depending upon programming language support. In classical inheritance where objects are defined by classes, classes can inherit attributes and behavior from pre-existing classes called base classes, superclasses, or parent classes. The resulting classes are known as derived classes, subclasses, or child classes. The relationships of classes through inheritance gives rise to a hierarchy. In prototype-based programming, objects can be defined directly from other objects without the need to define any classes, in which case this feature is called differential inheritance.

Friday, March 1, 2013

Human Class


This little program I wrote for practicing basics of class implementation in Python including attributes, methods (static methods and class methods) and properties. Of course, all the statistics I wrote are fake, especially my height and weight~lol~

class Human(object):
    """A basic class to demonstrate some properties of Python classes"""
    ## constant factor to convert pounds to kilograms
    kPoundsToKg = 0.4536;
    ## constant factor to convert feet to meters
    kFeetToMeters = 0.3048;
    def __init__(self, *args, **kwargs):
        """initialize data attributes from keyword arguments"""
        self.first_name = kwargs.setdefault('first');
        self.last_name = kwargs.setdefault('last');
        self.height = kwargs.setdefault('height');
        self.weight = kwargs.setdefault('weight');
    def bmi(self):
        """compute body mass index assuming metric units"""
        return self.weight / float(self.height)**2;
    @staticmethod
    def get_taller_person(human1, human2):
        """return which of the two instances is taller"""
        if (human1.height > human2.height):
             return human1;
        else: return human2;
    @classmethod
    def create_meng(cls):
        """constructor to create Meng Xie"""
        return cls(
            first='Meng',
            last='Xie',
            height=6.083*cls.kFeetToMeters,
            weight=158*cls.kPoundsToKg
        );
    # Begin properties
    def fn_getter(self):
        """getter for full name"""
        return '%s %s'%(self.first_name, self.last_name)
    def fn_setter(self, val):
        """setter for full name"""
        self.first_name, self.last_name = val.split()
    ## property for getting and setting the full name
    full_name = property(fn_getter, fn_setter);
    # End properties
    # Alternate property defs for Maya 2010+
    """
    @property
    def full_name(self):
        return '%s %s'%(self.first_name, self.last_name);
    @full_name.setter
    def full_name(self, val):
        self.first_name, self.last_name = val.split();
    """
    def __str__(self):
        """print the full name"""
        return self.full_name;
    def __repr__(self):
        """return a string that can be evaluated"""
        return "Human(%s='%s', %s='%s', %s=%s, %s=%s)"%(
            'first', self.first_name,
            'last', self.last_name,
            'height', self.height,
            'weight', self.weight
        );